UPDATE 21.11.2018: More easier process with PowerShell can be found at Johan’s blog post.
**************************************
This is an combination and update to Johan Arwidmark’s post and Alexey Semibratov’s post. So initial credits goes to them!
One of the greatest benefits of the MDOP software assurance add-on is Diagnostics and Recovery Toolset (DaRT). With DaRT you have the remote connection viewer that allows you to remote into WinPE during your SCCM OS Deployments.
- Install DaRT 10 (MSDaRT100.msi) administrative install: msiexec /a MSDaRT10.msi. Accept the default settings on your Windows Server 2012 R2 site server
- Using File Explorer, navigate to the C:\Program Files\Microsoft DaRT\v10 folder.
- Copy the Toolsx86.cab file to C:\Program Files\Microsoft Deployment Toolkit\Templates\Distribution\Tools\x86
- Copy the Toolsx64.cab file to C:\Program Files\Microsoft Deployment Toolkit\Templates\Distribution\Tools\x64
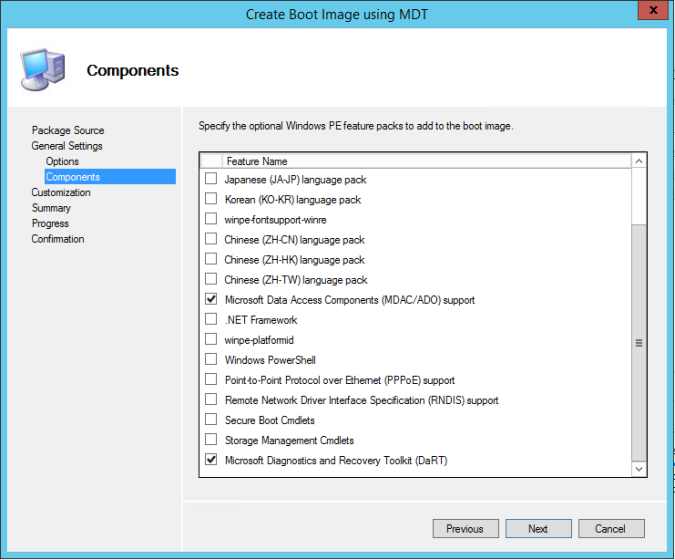
- Create a new SCCM Boot image using the MDT wizard; select the DaRT component during creation.
Enable Monitoring in Deployment Workbench
To install the web service and database used for monitoring ConfigMgr you use MDT Deployment Workbench. In this example my site server is named CM01.
- On CM01, using the Deployment Workbench, right-click Deployment Shares and select New Deployment Share.
- Use the following settings for the New Deployment Share Wizard.
- Deployment share path: D:\MDTDeployment
- Share name: MDTDeployment$
- Deployment share description: MDT Deployment
- Options: <default settings>
- Right-click the new MDT Deployment Deployment Share and select Properties.
- In the Monitoring tab, select the Enable monitoring for this deployment share check box, and then click OK.
Note: It will take a while for the Deployment Workbench to create the monitoring database and web service. The console even appears to hang, but no worries, just give it some time
Setup SCCM to use Monitoring
After enabling the monitoring feature, you need to configure the CustomSettings.ini file in your settings package. In these steps I assume you already created a MDT 2013 Task Sequence, a MDT 2013 package, and a Settings package as part of that process.
- On CM01, using File Explorer, navigate to your Settings package.
- Using Notepad, edit the CustomSettings.ini file, and add the following entry in the end: EventService=http://CM01:9800
- Update the Distribution Points for Settings package
Implement earlier appearance of computers with Dart Remote Recovery console in MDT monitoring
- Download scripts: https://msdnshared.blob.core.windows.net/media/MSDNBlogsFS/prod.evol.blogs.msdn.com/CommunityServer.Components.PostAttachments/00/10/54/01/75/EnableDart.zip
- Copy the to some location on the server, I’ll call it \\cm01\Sources\OSD\PreExecHook here
- Copy the following files from C:\Program Files\Microsoft Deployment Toolkit\Templates\Distribution\Scripts to this folder:
- ZTIDataAccess.vbs
- ZTIDiskUtility.vbs
- ZTIGather.wsf
- ztiRunCommandHidden.wsf
- ZTIUtility.vbs
- Optional: Using Aut2exe.exe tool from AutoIt compile PreExecHook.au3 to x86PreExecHook.exe and AMD64PreExecHook.exe checking “64 bit” flag. You don’t have to use it, it is to suppress the “dos box” with script running by providing TS engine the EXE file instead of WSF. TS Engine always runs VB Scripts with CSCRIPT.EXE causing a big “dos” box with script running.
- Go to properties of your Boot Image and go to “Customization”
- Check “Enable prestart command” and type in “X:\SMS\PKG\SMS10000\x86PreExecHook.exe” without quotes for x86 boot image and “X:\SMS\PKG\SMS10000\AMD64PreExecHook.exe” for x64 boot image if you use the AutoIT EXE or use the WSF script:
wscript.exe X:\SMS\PKG\SMS10000\EnableDart.wsf /EventService:http://cm01:9800
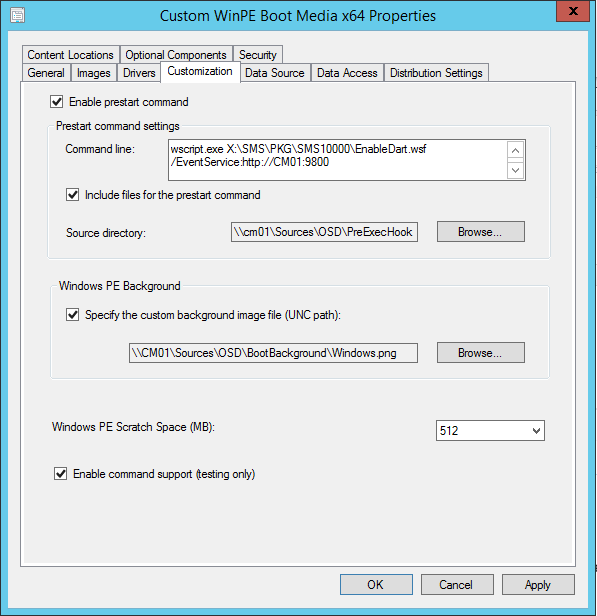
- Check “Include Files for the prestart command” and use the path where you copied all the files to – i.e. \\server\Packages\PreExecHook
- After clicking “OK” it will ask you to update Distribution Points. Go ahead and do it.
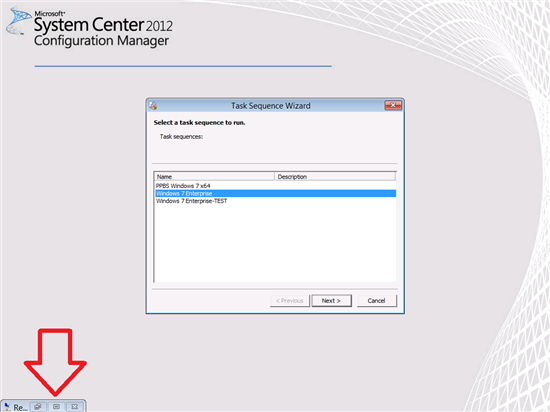
Now you will have your Remote Recovery Running earlier, like on this picture below – even before the task sequence selection!
Configure the task sequence to use the new boot image
If you have existing task sequences, you need to configure them to use the new boot image.
- Configure your task sequence to use the new boot image, and start a deployment.
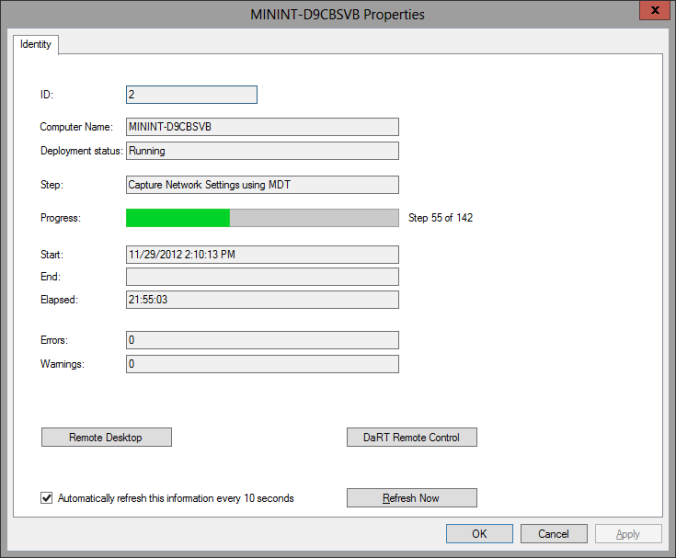
- Using Deployment Workbench, when you see the client in the Monitoring node
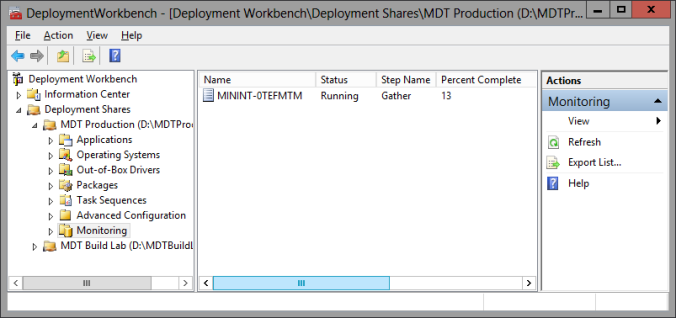
you can double-click it, and then select DaRT Remote Control to remote into it.
-Niku-
